How to manage secrets in Azure Kubernetes Service (AKS)
10 September 2021
Overview
We all have secrets, and our applications are no different. Secrets are sensitive information such as API keys, database passwords, and primary/secondary keys, and we should protect them as best as we can. But how do we properly manage them in Kubernetes?
Build image to test
Before we start, we need a container to help us test our secrets. To do this, I created a Spring Boot project with WebFlux and Key Vault. Next, we need to connect our local with the container registry, which I’ve created for this.
az login
az account set -s ‘SET_YOUR_SUBSCRIPTION’
az config set defaults.acr=vobcr
az acr login -n vobcr
Modify pom.xml and add your container registry.
<properties>
   <docker.image.prefix>vobcr.azurecr.io</docker.image.prefix>
   <java.version>1.8</java.version>
   <jib-maven-plugin.version>2.2.0</jib-maven-plugin.version>
</properties>
Create the controller. package com.example.kubekeyvault;
import org.springframework.beans.factory.annotation.Value;
import org.springframework.web.bind.annotation.GetMapping;
import org.springframework.web.bind.annotation.RestController;

@RestController
public class HelloController {
   private final String helloMessage;

   public HelloController(@Value("${application.secret}") String helloMessage) {
       this.helloMessage = helloMessage;
   }

   @GetMapping
   public String Get(){
       return this.helloMessage;
   }
}
Now, build and deploy the container into Azure Container Registry.
mvn compile jib:build
Kubernetes Generic Secrets
Kubernetes secrets are independent entities that help us with our secrets. By default, Kubernetes secrets are not encrypted but encoded with base 64, so if you store files inside a git repository, anyone can decode them. Since secrets are separate when we create our PODs, we need to reference the secret, and we can do this as:
- Files in a volume mounted to the container
- Environment variables Create a generic secret which we will use for deployment
kubectl create secret generic generic-secrets --from-file=secrets.properties --dry-run=client -o=yaml > generic-secrets.yaml
Then combine the secret and deployment into a single file (using — to split configuration)
apiVersion: v1
data:
  secrets.properties: YXBwbGljYXRpb24uc2VjcmV0PUhlbGxvIGZyb20gc2VjcmV0DQphenVyZS5rZXl2YXVsdC5lbmFibGVkPWZhbHNl
kind: Secret
metadata:
  creationTimestamp: null
  name: generic-secrets

---

apiVersion: apps/v1
kind: Deployment
metadata:
  creationTimestamp: null
  labels:
    app: generic
  name: generic
  namespace: default
spec:
  replicas: 1
  selector:
    matchLabels:
      app: generic
  strategy: {}
  template:
    metadata:
      creationTimestamp: null
      labels:
        app: generic
    spec:
      containers:
      - image: vobcr.azurecr.io/kube-keyvault:latest
        name: kube-keyvault
        ports:
        - containerPort: 8080
        args: ["--spring.config.additional-location=file:/cnf/secrets.properties"]

        volumeMounts:
        - name: properties
          mountPath: "/cnf"
          readOnly: true
      volumes:
      - name: properties
        secret:
          secretName: generic-secrets
So how does it work? First, we’ll have a look at the volumes sections. This is how we map our secret to our deployment and then use volumeMounts to put our configuration file into the folder /cnf inside the container. Then, finally, we will add that mounted file to be loaded into Spring using our args directive.
Let’s apply our change and expose service so we can test our service later.
kubectl apply -f generic-deployment.yaml
kubectl expose deployment generic
Next, we we need to get endpoint IP.
C:\Apps>kubectl get ep generic
NAME      ENDPOINTS          AGE
generic   10.244.0.18:8080   108s
And call the API to get a result.
C:\Apps>kubectl attach curl -c curl -i -t
If you don't see a command prompt, try pressing enter.
[ root@curl:/ ]$ curl 10.244.0.18:8080
Hello from secret
While generic secrets are straightforward, they come with a problem, as anyone can easily decode our secrets using the base64 tool.
root@DESKTOP-HLIKO8T:/mnt/c/apps# echo YXBwbGljYXRpb24uc2VjcmV0PUhlbGxvIGZyb20gc2VjcmV0DQphenVyZS5rZXl2YXVsdC5lbmFibGVkP
WZhbHNl  | base64 --decode
application.secret=Hello from secret
Sealed secrets
Sealed secrets are the solution to our problem with generic secrets and allow us to save our files with secrets in git. You can even store your secret in a public repository since only the controller inside of Kubernetes will be able to decode our secrets. Before we begin, we need to install a sealed secret controller into your cluster.
wget https://github.com/bitnami-labs/sealed-secrets/releases/download/v0.12.1/controller.yaml
kubectl apply -f controller.yaml
Then we need to get a public key, so find the sealed secrets controller pod name.
kubectl get pods --all-namespaces=true
Get logs from your controller and save the key as key.pem
kubectl logs kubectl logs sealed-secrets-controller-6b7dcdc847-9l8pz -n kube-system -n kube-system
Let’s begin with our sealed secrets. Run the command below to generate the YAML file, which will contain our generic secrets (the same as we did before).
kubectl create secret generic sealed-secret --from-file=secrets-sealed.properties --dr
y-run=client -o=yaml > generic-secret.yaml
Open the generic-secret.yaml update manifest by adding namespace; sealing secrets will fail if you don’t do this. Your file should look like this.
apiVersion: v1
data:
  secrets-sealed.properties: YXBwbGljYXRpb24uc2VjcmV0PUhlbGxvIGZyb20gc2VhbGVkIHNlY3JldHMNCmF6dXJlLmtleXZhdWx0LmVuYWJsZWQ9ZmFsc2U=
kind: Secret
metadata:
  namespace: default
  name: sealed-secret
Now you’ll need to seal your secrets using the command.
kubeseal --format=yaml --cert=key.pem < generic-secret.yaml > sealed-secret.yaml
NOTE: you’ll need to have kubeseal installed. Read more at release page https://github.com/bitnami-labs/sealed-secrets/releases/tag/v0.16.0
Create a deployment and combine your files into one sealed-deployment.yaml
apiVersion: bitnami.com/v1alpha1
kind: SealedSecret
metadata:
  creationTimestamp: null
  name: sealed-secret
  namespace: default
spec:
  encryptedData:
    secrets.properties: AgCeEdNVq4geLpJGoQgSFP+g0h8K3wQfT5J5TFelw0/rt2GTdhpwJOLx27iRg/ukRBx1rLsVrn8U6D8Vg7sKHV51d/Iw3NZVjQDNucDf/HmCMdP8OA6FyUFNnhMABOerhFXifbPJf/W/vdUpoRCh1DLJieMZh+aRBBxFk51lSG34v9kU1UlTd/VuiqnK0CIXXU3Gnw0Lxa3HBszTzsYs1LY6Ohji0ix/I8p+zJVUeugMssJOK0VLPFj/HpkzRvv25akjwXYseTkGBhtv1yf2m5VQn/CLU4J60r3a9OT6RIkpMyZYsZrqVw3vxRNFfwoEwEM/pPo7pwY82/RrEY9pw3fBAka2AvfJPmBTT8+g0DrTA5/7afFb3fSOA8izWmYCn7KV5wb2EYxzIeCUBfsdWvS4ICrr3+MILd+uvxGJBGPa//gz4cO8A7yv1+o1CLrg20tIB7cmw3nM5JKtDEQy5hZ6/y7w0+ulhlgfNlHheXeuoDPQIhiKGNpldJLk0GRNfmzPEoW4VbAB8plQoQmH2agqvi4qmqqzNJjjUajNNJPaXshqGQoE6Q1HunFvPsudrJTMkSCBSuNGudBU8kFZwdQpfjHSMhghwJL1hOGumU9jH7S2w6ZH4CznP7PS/3Mgl9pIIuj8CFoBoXmEPB5MXzSMGH8Cx/N1fDNtXAlmLmjAn5YfyY+nBrr95LOtXG/xXaFLFlH0GHjGPvyAF3a4OKhvHfFxgY0XSL/dlf9eWsTjUVQW9QwiUiBu3qCP2epzcTeyPg+zw1yufRbkLSYO2veRdsRY6KTxCALHVw==
  template:
    data: null
    metadata:
      creationTimestamp: null
      name: sealed-secret
      namespace: default


---

apiVersion: apps/v1
kind: Deployment
metadata:
  creationTimestamp: null
  labels:
    app: sealed
  name: sealed
  namespace: default
spec:
  replicas: 1
  selector:
    matchLabels:
      app: sealed
  strategy: {}
  template:
    metadata:
      creationTimestamp: null
      labels:
        app: sealed
    spec:
      containers:
      - image: vobcr.azurecr.io/kube-keyvault:latest
        name: kube-keyvault
        ports:
        - containerPort: 8080
        args: ["--spring.config.additional-location=file:/cnf/secrets.properties"]

        volumeMounts:
        - name: properties
          mountPath: "/cnf"
          readOnly: true
      volumes:
      - name: properties
        secret:
          secretName: sealed-secret
As you can see, the deployment is the same as normal secrets. The only difference is that our secrets are now encrypted and safe to store in git.
Apply deployment.
kubectl apply -f sealed-deployment.yaml
kubectl expose deployment sealed
Now we need to find endpoint IP.
C:\Apps>kubectl get ep sealed
NAME     ENDPOINTS          AGE
sealed   10.244.0.19:8080   3s
Let’s make a call to our API and see what it returns.
C:\Apps>kubectl run curl --image=radial/busyboxplus:curl -i --tty --rm
If you don't see a command prompt, try pressing enter.
[ root@curl:/ ]$ curl 10.244.0.19:8080
Hello from sealed secrets
Sealed secrets provide us with a more sophisticated way to manage our secrets, but there are some drawbacks: Let’s say you have sealed your secrets, and you continue your development. Now you want to add a new secret into your file, so you need to extract an old file so you won’t lose the configuration already added.
Pod identity & Azure Key Vault
Azure Active Directory pod-managed identities use Kubernetes primitives to associate managed identities for Azure resources and identities in Azure Active Directory (AAD) with pods.
The first step would be to enable pod identity in our cluster.
az extension add --name aks-preview
az feature register --name EnablePodIdentityPreview --namespace Microsoft.ContainerService
az aks update -g RESOURCE_GROUP -n KUBERNETES_CLUSTER_AME --enable-pod-identity --enable-pod-identity-with-kubenet
Create identity Let’s define some env variables.
export IDENTITY_RESOURCE_GROUP="blog"
export CLUSTER="vobkube"
export IDENTITY_NAME="aks-kube-keyvault-blog"
export POD_IDENTITY_NAMESPACE="default"
Then run commands to create an identity.
az identity create --resource-group ${IDENTITY_RESOURCE_GROUP} --name ${IDENTITY_NAME}
export IDENTITY_CLIENT_ID="$(az identity show -g ${IDENTITY_RESOURCE_GROUP} -n ${IDENTITY_NAME} --query clientId -o tsv)"
export IDENTITY_RESOURCE_ID="$(az identity show -g ${IDENTITY_RESOURCE_GROUP} -n ${IDENTITY_NAME} --query id -o tsv)"
Now create an AKS pod identity.
az aks pod-identity add --resource-group ${IDENTITY_RESOURCE_GROUP} --cluster-name ${CLUSTER} --namespace ${POD_IDENTITY_NAMESPACE} --name ${IDENTITY_NAME} --identity-resource-id ${IDENTITY_RESOURCE_ID}
Unfortunately, that command didn’t work on my machine.
root@DESKTOP:/mnt/c/Users/vovik# az aks pod-identity add --resource-group ${IDENTITY_RESOURCE_GROUP} --cluster-name ${CLUSTER} --namespace ${POD_IDENTITY_NAMESPACE}  --name ${POD_IDENTITY_NAME} --identity-resource-id ${IDENTITY_RESOURCE_ID}
Operation failed with status: 'Bad Request'. Details: 400 Client Error: Bad Request for url: https://management.azure.co
m/subscriptions/8dce2b16-22b8-4495-b894-6de77c7aefdb/resourceGroups/blog/providers/Microsoft.ManagedIdentity/userAssigne
dIdentities/application-identity%0D?api-version=2015-08-31-preview
Therefore I echo $IDENTITY_RESOURCE_ID and inserted it directly into the command.
root@DESKTOP-HLIKO8T:/mnt/c/apps# echo $IDENTITY_RESOURCE_ID
/subscriptions/8dce2b16-22b8-4495-b894-6de77c7aefdb/resourcegroups/blog/providers/Microsoft.ManagedIdentity/userAssignedIdentities/aks-kube-keyvault-blog
root@DESKTOP-HLIKO8T:/mnt/c/apps# az aks pod-identity add --resource-group ${IDENTITY_RESOURCE_GROUP} --cluster-name ${CLUSTER} --namespace ${POD_IDENTITY_NAMESPACE}  --name ${IDENTITY_NAME} --identity-resource-id /subscriptions/8dce2b16-22b8-4495-b894-6de77c7aefdb/resourcegroups/blog/providers/Microsoft.ManagedIdentity/userAssignedIdentities/aks-kube-keyvault-blog
AAD role propagation done[############################################]  100.0000%
Wait 30 seconds for identity role assignment propagation.
The deployment file (pod-identity.yaml) contains only our deployment.
apiVersion: apps/v1
kind: Deployment
metadata:
  creationTimestamp: null
  labels:
    app: podidentity
  name: podidentity
  namespace: default
spec:
  replicas: 1
  selector:
    matchLabels:
      app: podidentity
  strategy: {}
  template:
    metadata:
      creationTimestamp: null
      labels:
        app: podidentity
        aadpodidbinding: service-a
    spec:
      containers:
      - image: vobcr.azurecr.io/kube-keyvault:latest
        name: kube-keyvault
        ports:
        - containerPort: 8080

        args:
          - --subscriptionid=SUBSCRIPTION_ID
          - --clientid=IDENTITY_CLIENT_ID
          - --resourcegroup=RESOURCE_GROUP
In deployment replace
- SUBSCRIPTION_ID - with your subscription
- RESOURCE_GROUP - with your resource group
- IDENTITY_CLIENT_ID - with the output of env variable IDENTITY_CLIENT_ID
- Metadata.labels.aadpodidbinding set it to name of your pod identity or in this example aks-kube-keyvault-blog
Let’s apply our configuration.
kubectl apply -f pod-identity.yaml
kubectl expose deployment podidentity
But when we query the container’s log, I can see an error.
14:05:19.990 [main] ERROR org.springframework.boot.SpringApplication - Application run failed
java.lang.IllegalStateException: Failed to configure KeyVault property source

Caused by: com.azure.core.exception.HttpResponseException: Status code 403, "{"error":{"code":"Forbidden","message":"The user, group or application 'appid=df249ace-3b84-4535-a6d6-a3738b750d24;oid=0c36321c-8eb3-46cd-bc24-8ced3c827a2d;iss=https://sts.windows.net/b61421ff-c34d-457a-a750-2b4e91983773/' does not have secrets list permission on key vault 'vobsecrets;location=australiaeast'. For help resolving this issue, please see https://go.microsoft.com/fwlink/?linkid=2125287","innererror":{"code":"AccessDenied"}}}"
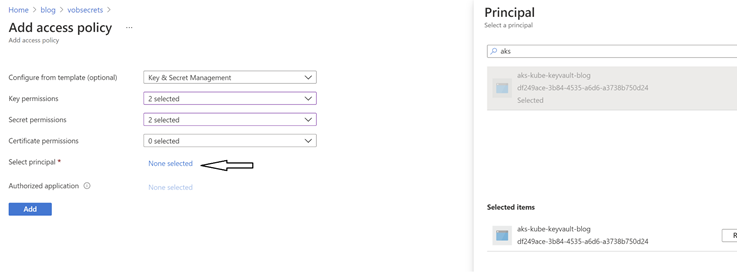
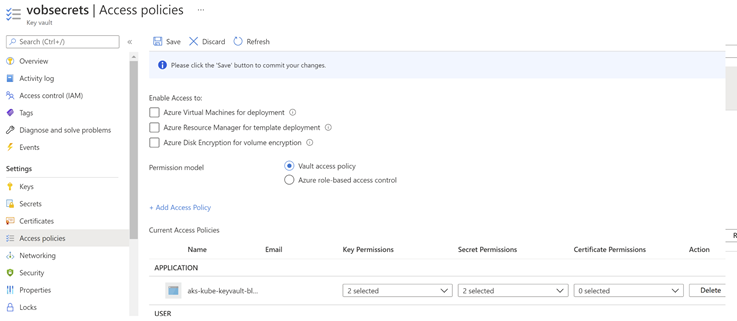
What went wrong? Why does it not work? It’s pretty evident that our app can reach Key Vault but is getting an access denied exception, which we would expect since we didn’t grant our application access to it. So let’s fix this:
- Go to your Key Vault
- Access policies
- Add Access Policy
- Select principal
- Add
- Save
Now you can delete the pod or reapply the manifest and test.
C:\Apps>kubectl get ep keyvaultpod
NAME          ENDPOINTS          AGE
keyvaultpod   10.244.0.23:8080   25h

C:\Apps>kubectl run curl --image=radial/busyboxplus:curl -i --tty --rm
If you don't see a command prompt, try pressing enter.
[ root@curl:/ ]$ curl 10.244.0.23:8080
Hello from keyvault[ root@curl:/ ]$
Summary
Pod identity is my favourite way since it allows me to build another pipeline to store secrets inside Azure DevOps Variables securely. In addition, pod identity will enable me to use Azure resources without any extra tokens/keys, similar to how we did with Key Vault. Just grant access at the resource level, and here we go.